Tuesday, September 6, 2011
Winding a Skein into a Ball
Remove and save the label for sett suggestions or gauge. Open up the skein. Ideally, you will own an umbrella swift and ball winder and these instructions are assuming you do.
Insure that the skein is not twisted, then place the skein on the swift bringing the swift up to meet the circumference of the skein. Locate the beginning/end of the yarn; this is where the beginning and end were tied together. Cut this loop (last) and the remaining tie-bands off the skein. Caution: This step should not be done prior to placing the skein on the swift.
Wind off a couple of rounds to see if the yarn is going to feed evenly and insert the end into the ball winder and wind into a center pull ball. If the yarn seems like it is tangled, it is probably just a kink in that spot. Resist the temptation of weaving in and out as it misaligns the yarn. Usually, if you will give the yarn a little pop close to the skein, it will loosen the kink and you can proceed to wind into a center-pull ball.
If you are using a hand dyed yarn and using more than one skein, lay one skein on top of the other to insure the color is running the same direction. Then, be sure you wind in the same color order.
Monday, September 5, 2011
Publishing with New Laptop
If you are a follower, you might have noticed that I posted approximately 30 pages in the last few days. Most are from my old website which presently resides on my old desktop. We are in the process of clearing the harddrive and I will be posting from my new laptop. I could not publish from the laptop and hopefully, this change to the new blogger interface that Kim recommended will help.
Sunday, September 4, 2011
Mother Bunny and Bunny Love
Thanks for bearing with me while I transfer files from my former website to blogger. There will be many files that I hope will be helpful to weavers.
In addition, here are the latest rug hooking projects I finished and gave to my sister-in-law who loves bunnies. They were designed by Karen Kahle of Primitive Spirit Rugs and were a lot of fun and fast to hook.


In addition, here are the latest rug hooking projects I finished and gave to my sister-in-law who loves bunnies. They were designed by Karen Kahle of Primitive Spirit Rugs and were a lot of fun and fast to hook.


Knitting or Weaving Yarn?
I have often heard yarns referred to as knitting yarns or weaving yarns. I've heard it said that yarns on a cone are weaving yarns and yarns on a skein or ball are knitting yarns; that stretchy yarns should not be used for weaving; that knitting yarns are pre-washed and weaving yarns are not pre-washed. An educated guess is that a dyed yarn has been pre-washed.
It can certainly be confusing but the truth is that none of these factors define a knitting or weaving yarn. These are only conditions of the yarn that should be considered before knitting or weaving a project.
If you are in doubt of whether a yarn will make a good knitting or weaving yarn, first consider how you will use it. For example, a stretchy yarn might not make the best warp. But, it might be used for example. Or, if in doubt, and you want to use the yarn, use it as weft.
If you are using a hand dyed yarn, consider that it has been fulled some and sett it closer than a mill dyed yarn. If knitting, knit a swatch with 3 to 4 sized needles and wash the swatch to determine the needle size to use for the finished product.
In addition to how you will use it, consider the qualities you want in the finished product. Would you like a scarf that is lightweight or heavy, warm or cool accessory, nice drape or very light? Qualities of the finished product are largely determined by the fiber content of the yarn and structure of the fabric.
For a lightweight scarf, go with a laceweight yarn. For something a little heavier, a fingering weight and even heavier, a DK weight. (If you go any heavier, you're going to have a saddle blanket around your neck. Ask me how I know!)
For a lightweight, warm scarf, consider a protein (animal) fiber such as wool, silk alpaca, etc., or combinations of the same such as Jaggerspun Zephyr Silk/Merino. Melody Superwash Wool or Harmony Laceweight Merino are also good choices for warm, lightweight scarves.
For a lightweight, cool accessory with nice drape, tencel is a good choice and can be used for both knitting and weaving warp or weft. For something a little lighter, knit or weave with 5/2 perle cotton.
By considering the structure, any of the examples above can be knitted or woven so that you have an airy scarf or one that offers more warmth and drape. Choose knitted or woven lace for an airy scarf, stockinette or twill for a heavier scarf. Change the gauge or sett to suit the fabric you desire.
Knit or weave with the yarn of your choice and enjoy the process!
It can certainly be confusing but the truth is that none of these factors define a knitting or weaving yarn. These are only conditions of the yarn that should be considered before knitting or weaving a project.
If you are in doubt of whether a yarn will make a good knitting or weaving yarn, first consider how you will use it. For example, a stretchy yarn might not make the best warp. But, it might be used for example. Or, if in doubt, and you want to use the yarn, use it as weft.
If you are using a hand dyed yarn, consider that it has been fulled some and sett it closer than a mill dyed yarn. If knitting, knit a swatch with 3 to 4 sized needles and wash the swatch to determine the needle size to use for the finished product.
In addition to how you will use it, consider the qualities you want in the finished product. Would you like a scarf that is lightweight or heavy, warm or cool accessory, nice drape or very light? Qualities of the finished product are largely determined by the fiber content of the yarn and structure of the fabric.
For a lightweight scarf, go with a laceweight yarn. For something a little heavier, a fingering weight and even heavier, a DK weight. (If you go any heavier, you're going to have a saddle blanket around your neck. Ask me how I know!
For a lightweight, warm scarf, consider a protein (animal) fiber such as wool, silk alpaca, etc., or combinations of the same such as Jaggerspun Zephyr Silk/Merino. Melody Superwash Wool or Harmony Laceweight Merino are also good choices for warm, lightweight scarves.
For a lightweight, cool accessory with nice drape, tencel is a good choice and can be used for both knitting and weaving warp or weft. For something a little lighter, knit or weave with 5/2 perle cotton.
By considering the structure, any of the examples above can be knitted or woven so that you have an airy scarf or one that offers more warmth and drape. Choose knitted or woven lace for an airy scarf, stockinette or twill for a heavier scarf. Change the gauge or sett to suit the fabric you desire.
Knit or weave with the yarn of your choice and enjoy the process!
Warping Board or Mill?
I prefer a warping board as does at least one master weaver and another production weaver I know. They both have their place. If you have nowhere to mount a warping board, then a mill might be the answer. It has its advantages and disadvantages. For long warps with very little color change or for limited physical space, they are very good. You might consider a door frame with removable dowels if you have limited space. Just don't wind a warp over a door that you will need to enter or exit! When you've finished winding the warp, remove the dowels from the door frame. Be sure the dowels are of maple or oak or they will bend and break. Ask me how I know. If you can't do that, you might consider warping pegs as they are portable and inexpensive. These are good for short warps.
The "tickets" to good selvages:
Keep your weaving space midway between the breast beam and beater - known as the "sweet spot." It's where you get the best shed. Only weave for about an inch and advance your warp often. Don't try to get your money's worth from an advance of the warp by weaving as close as you can to the breast beam and as close as you can to the beater. Your selvages will show it when you take your warp off the loom. And here is the reason why: the arc of the weft is different at the breast beam than it is at the beater. So, narrow the space in which you weave.
And do not fool with the selvages as you weave. It will loosen the tension on your selvages so that when you take it off the loom, the selvages will "wave" lengthwise.
Strive for an even beat. Get in a rhythm with throwing and beating. When you get up from the loom, loosen your tension and tighten when you return to weave - unless you are going to come back in a few hours. Even then, when you sit down to weave, beat before you throw your next pick as the pick will have "traveled" ever so slightly toward the breast beam so that when you hold your weaving up to the light, the beat will be uneven - even after washing.
Don't overload your bobbins as it puts pressure on the selvages. Throw evenly and, again, with rhythm. You will always have one selvage that is not as good as the other. It's universal as most of us are not ambidextrous.
More About Color
Once upon a time, I didn't like yellow - or any derivative of it - like yellow orange, orange, yellow green, olive, etc.. I could not bring myself to include yellow, yellow orange, orange or even a bright turquoise in a handwoven garment. Something was missing from my fabrics and I really couldn't put my finger on it. After all, I was choosing colors that I loved that "went together." This must have seemed a problem to a lot of weavers as Marcy Petrini, friend and weaving teacher, taught a portion of one of her classes entitled "How to Make an Ugly Color Disappear." We were instructed to bring the colors that we liked the least. Everyone showed up with some fairly hideous colors, in my opinion at the time. (I have since taken a liking to all colors.) I took along a very shiny rayon of which I had space dyed in complementary colors, turquoise and orange. It even had the "benefit" of a little brown where it wicked in the middle. My thoughts were 'let's see what she can do with this.' (-: With a little twisting of yarns in the more conservative colors that I loved and in varying amounts, I was pleasantly surprised! The twist of yarn in the colors I loved was no longer dull but full of life! I planned a project with just a highlight of that shiny turquoise and orange and the fabric was so alive that I used up the remaining of the yarn in other projects and had to dye more!
Since then, I have had opportunity to do a lot of testing with color and have found that I generally want a little spark or highlight in hand painted yarn so that the resulting fabric will be warm and friendly. If I don't add it into the colorway, I try to add it by using a highlight of mill dyed in the warp or a warm weft in a handwoven or knitting two together in a knit. In order to make life easier for times when I don't want to do a lot of color planning for the end fabric, I find it best to add a small section of highlight in the dye process, adding only a little so that the resulting fabric will have an appropriate amount of spark.
Since then, I have had opportunity to do a lot of testing with color and have found that I generally want a little spark or highlight in hand painted yarn so that the resulting fabric will be warm and friendly. If I don't add it into the colorway, I try to add it by using a highlight of mill dyed in the warp or a warm weft in a handwoven or knitting two together in a knit. In order to make life easier for times when I don't want to do a lot of color planning for the end fabric, I find it best to add a small section of highlight in the dye process, adding only a little so that the resulting fabric will have an appropriate amount of spark.
Color Tips for Fiber
What do a color wheel, a black and white copy machine, the Fibonacci series, beautiful photography, a beautiful yarn, a ride through an scenic area and a small hole in a piece of paper have in common? These can all be tools for study in color.
In helping a weaver come up with some stripe sequences that were pleasing to her, I thought about my past experiences with color and "tools" I have used to design something pleasing. None of these are original or hard and fast rules. As for me, a lot of what I know about color is intuitive. But tools have helped my intuition out a lot of times!
What would the world be without color? There are so many ways to use it in art that it can become somewhat confusing and a lot depends on the medium with which one works. Color is mixed differently depending on the medium, i.e., dye, type of dye, oils, acrylics, water color, fabric paint and even mixing as I have with the help of some computer software.
Rules differ for various fiber techniques as well: weft has to be considered with weaving as prints need to be considered with quilting. Surface design requires knowing what color interaction is going to take place when one color is laid on top of another. Pattern weaving shows up better with a blending of color or tone-on-tone, if not a solid. Lace knitting shows up better in light colorways and/or ones with similar values.
Invest in a good color wheel. Direct complementary colors are opposite on the color wheel and generally always look good together. Split complements probably work better to prevent colors from appearing gray or brown. Triads are as the name implies and make somewhat of a triangle on the color wheel and are very pleasing together, particularly in large pieces. Analagous colors are next to each other on the color wheel and can be blended in small pieces effectively. I have found in blending warps and/or wefts that the larger the woven piece, the more one can experiment with color. The same colors in a small piece can be overwhelming and confusing particularly in pattern weaving.
I took a class from Donna Sullivan once who had us to do color wrappings of yarn on cardboard. It is a very interesting thing to do to design both symmetrical and asymmetrical stripes in neutrals from black to white, dark brown to beige, complementary colors, split complements, triads, etc. Use a strip of sturdy cardboard and apply double-sided tape to the back. Embroidery floss works great for this if you don't have a large palette of yarns. If you feel uncertain, Fibonacci series to the rescue! Without going into the history of Fibonacci, I will briefly say that it is a system that can be used to come up with a pleasing color blend or stripe by adding a number such as 1 with itself to equal 2, then 1 + 2 = 3, 2 + 3 = 5, 3 + 5 = 8, 5 + 8 = 13, etc. You may choose any of these numbers in sequence or out of sequence to design something that is generally always pleasing to the eye.
Still something wrong? Take it to the black and white copy machine. There was a good article in "Handwoven" several years back and it contained a gray scale. Colors that are equidistant from either end of the scale work well together. Making a copy in black and white will give you the overall feeling of a color that is too dark or light for your sequence or if you have used too much of it or not enough. For example, a little yellow goes a long way. Sometimes, just 1 or 2 ends here and there of a highlight color will bring a fabric to life.
If you can't seem to come up with inspiration, flip through a book of beautiful photography of scenery. Colors of nature are in good balance and always pleasing. Make a wrapping with the colors you see or even one portion of the picture. This is where a one-inch square hole cut in the middle of a piece of paper will come in handy. Move the paper around until you see the exact colors and proportions that are pleasing to you and make a wrapping. No books of photography? There are lots of sites online including Webshots with wonderful photography. Or it may be a good excuse to take a ride in a park near you or go for a walk. Take along your camera, a notebook, colored pencils or some embroidery floss. If you get caught without a camera, colored pencils or floss, write a word description such as intense sky blue. It may look different when you get home and pull your yarns together but chances are that you will like it a lot.
Visit an art gallery and study the colors in good paintings. What makes them good? What is the balance and proportion of color? What attracts you to the painting? What color(s) surrounds each color?
Or visit your stash of variegated or hand painted yarns that followed you home from some conference. Use the yarn as a jumping off point to design a beautiful piece of fabric. Pick up solids of some of the colorways that are in the colorway and design stripes featuring the hand painted yarn.
You can also use the hole in the paper to view your wrapping when you're finished. Look through it with only one eye and block out everything else around the wrapping, i.e., zero in on it and at different angles.
And, by all means, listen to music that inspires you whatever it may be. There's some color in there somewhere!
Tips for Using Hand Dyed Weaving Wefts
To keep a "pure" color sequence wind the skeins off in the same direction, i.e., berry, coral, lavender, blue - not one, one direction and the other the opposite. Don't wind as above and on next skein wind the opposite - blue, lavender, coral, berry. It's a matter of turning the skein over. Tip: Lay them on top of each other matching the colorway and put them on the skeiner (one at a time) going the same direction. And, wind off in the same direction, clockwise or counter-clockwise.
Wind all your bobbins at one time from the center and number sequentially starting at 1 for the last bobbin wound, then 2, 3, etc. back to the first bobbin wound. If you run out of a bobbin in the middle of the shawl, pull the end to the underside by about an inch. Overlap the beginning of the next bobbin by 4 or 5 warp threads and pull the end to the underside by about an inch.
With this method you can almost predict how a chosen color will "track" by the width of your warp. To accent a color within the hand dyed yarn, follow these steps: measure the length of the color you desire to accent. Measure the length of the entire colorway from start to finish. If your accent color is 15-1/2" long, the entire length of the colorway is 62" and the width in the reed is 31", you may have a column effect. If you would like a shift in color, offset your warp by a couple of inches either way, i.e., 29" or 32".
Or, you may just decide you like the random, unplanned look. Either way is a pretty effect.
Tencel Yarn Tips
 Yarn spun from 8/2 Tencel fiber is a natural yarn manufactured from wood by-products in an environmentally friendly method. Tencel, like linen, has very little elasticity but is worth the extra effort for the heavy drape, wonderful sheen and silky hand and natural, cool comfort of cotton. Tencel is equally suited for weaving, knitting and crocheting.
Shown on the left is a scarf woven on a 8/2 tencel painted warp.
If you are weaving with tencel, sett a little closer than cotton of the same weight. Advance often (every few inches)and do not fill bobbins as full as you would for another fiber. The weight of the bobbins pulling on the selvages can break the selvages. Some weavers double the outside 3 or 4 ends and/or use a floating selvage.
Finish in the washing machine and dryer or as is appropriate for the fiber. If using a fringe it should be twisted or braided as an untwisted fringe will start to disintegrate after a few launderings. Don't be alarmed that it feels like cardboard when you remove it from the loom. It will transform in the water! Personally, I remove from the washing machine (cold, delicate setting) and hard press with a hot iron, first one side, then the other, overlapping as I press. Then, polish both sides by *ironing.* Hang to finish drying and be ready to receive the weaver's handshake.
Tips for Tying on a Dummy Weaving Warp
This is an adaptation of tying a bowline knot. Some say this is like the weaver's knot; others don't. I don't really care; it works and I think you'll like it.
Make a 6 out of the yarn coming from the loom having the loose end on top of the 6. Yes, I made my 6 the other way!
The yarn being tied on is the "rabbit."
Now, for the fun part.
The rabbit comes up the hole, around the tree and back down the hole.
Grasp both ends of the "rabbit" yarn plus the end of yarn from the loom and pull. What do you know? A knot that will (k)not (; come loose.
Reasons for Tying a Dummy Weaving Warp
I have not always been sold on dummy warps and even made the comment one time that I knew the reason they called it a "dummy." I've changed my mind! Not only is it a good idea to tie a dummy warp to save time but to be able to weave to the very end of a hand dyed warp or use the ends for fringe with no waste. Here are other good reasons. When tying on, you can change the warp thread and sett. After weaving a dozen cotton towels, you might change to a fine wool and then weave some scarves, then maybe switch to linen and weave something else, resleying the reed each time. To change the appearance, use a different treadling sequence. (I will cover some of these possibilities at a later date. Other possibilities are to insert extra heddles when threading originally so that for subsequent warps a few changes can be made in the threading that will have maximum impact on the design. Borders can be changed by rethreading by leaving heddles on all shafts on both sides of the warp. Or if the original was woven with a border, remove and make a half hitch in front of the heddles; you can always add back in part or entirety at a later date. I will trying some of these tips myself in the near future and report back here on my progress. May just see how many items I can weave out of one warp and share pictures.
Storable Weaving Bobbins Tips
Need bobbins? The cardboard tube of a pant hanger can be cut to make 4-4" or 2-7" bobbins. Just wind a tight, even bobbin and don't get too close to the ends. They're cheap (-:, can be numbered and when you're finished with your weaving you can store the bobbins with a straight pin to hold the end in a zip-lock. I like to store my special novelty yarns in one bag, wools in another, towel yarns in another, etc. No more unwinding bobbins to have enough or buying more. And next time you want to weave towels, for example, look in your "towel bag" and start with leftover bobbins.
Weaving Treadling Options - Tromp as Writ
A good exercise and future reference can be had by simply weaving a long sampler on any threading. My background is in overshot and for that reason I refer to it often in the treadling options shown in these newsletters. However, don't stop there! Try them with any threading including twill and crackle as they are close family members of overshot.
The purpose of the exercise is not only to find out what treadlings you like but also the ones that work and the ones that won't for the threading you are using. Make careful notes including tagging the corresponding treadlings. You will go back to your sample time and time again.
This is the first in a series of treadling options and tips to be published for 4-shaft overshot. Many of you know the tromp as writ treadling but the first will cover the tromp as writ treadling and my method of treadling to insure that those just starting out will know the way I "think" overshot.
Four-shaft overshot consists of 4 blocks: A = 1 & 2; B = 2 & 3; C = 3 & 4 and D = 4 & 1. The blocks are threaded sequentially, i.e., A, B, C, B, C, D, and share a common thread between sequential blocks. Since looms vary from jack-style, counterbalance or countermarche, it is easier for explanation purposes to work with a direct tie-up, i.e., 1 treadle to 1 shaft. Think of covering the blocks or weaving the blocks when weaving the pattern rather than treadle numbers or treadle orders which really don't mean anything if you don't know what they are tied to. A tabby shot of 1 & 3 and 2 & 4 alternate with pattern shots. And, yes, I weave tabby with 2 feet!
In order to write a tromp as writ treadling for a pattern, begin on the right of the threading and work toward the left. If the A block (1 & 2) has 4 ends, treadle A (1 & 2) 3 times. If the B block is next and contains 6 threads (Remember that they share a common thread/2.), treadle B 5 times. For an example, I will use a jack-style loom since many weave with jacks. In order to weave or cover the A block (1 & 2), lift shafts 3 & 4 and cover or weave A (1 & 2). In essence, you subtract one from the number of ends that are in the block to obtain the number of pattern picks for a particular block. In fact, you can subtract or add picks to "square" the pattern remembering to keep the turning blocks an even number. The reason for this is that overshot pattern picks group together in pairs. When an uneven number of picks are woven in turning blocks, "ghost lines" will appear that look like errors. This is why it is better to write your own tromp as writ treadlings as many books including the book and pattern listed below are written differently.
In this and future treadling options, I will give you the treadling I take to the loom with me for the Mary Ann Ostrander pattern from M. Davison's A Handweaver's Pattern Book, page 146. Balance threading with the first 17 ends.
A1, B1, (C2), B1, A1
D1, (C2), D1
A1, B1, (C2), B1, A1
D1, C1, B1, A3, D3, C5, (B4), (C2), (B4), (C2), (B4), C5, D3, A3, B1, C1, D1
Continue weaving using tabby (1 & 3/2 & 4) and balance with the first 3 lines or follow the draft below and balance with the first 16 pattern picks. Remember to weave with tabby.

Weaving Treadling Options - Echo/Tromp as Writ
Pattern (2 colors of same size) and tabby
There are 4 blocks in this 4-shaft overshot treadling:
Blocks A B C D
Color 1 1 & 2 2 & 3 3 & 4 4 & 1
Color 2 2 & 3 3 & 4 4 & 1 1 & 2
Tabby Tabby Tabby Tabby
Color 1 1 & 2 2 & 3 3 & 4 4 & 1
Color 2 2 & 3 3 & 4 4 & 1 1 & 2
Tabby Tabby Tabby Tabby
Tromp as Writ:
A1, B1, (C2), B1, A1
D1, (C2), D1
A1, B1, (C2), B1, A1
D1, C1, B1, A3, D3, C5, (B4), (C2), (B4), (C2), (B4), C5, D3, A3, B1, C1, D1
Balance with the first 3 lines.
Here is just an inkling of how it appears. To show the entire treadling would require a large amount of room but am sure this will give you an idea of the elongation of the pattern.

Saturday, September 3, 2011
Calvary Twill Weaving Pattern
Calvary twill© - may be used for personal use only and not copied for resale.
Repeat the first 20 ends and balance with one end on shaft 1.
Note: two repeats of the design are included in order to see the 3 crosses on the hill.

Repeat the first 20 ends and balance with one end on shaft 1.
Note: two repeats of the design are included in order to see the 3 crosses on the hill.

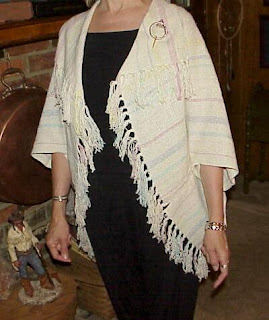
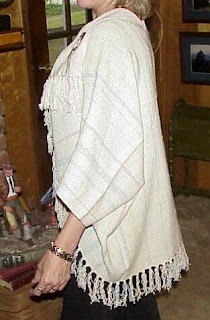
Cocoon Jacket Schematics
Width in the reed was 27 inches and I actually wove 40-3/4 inches for the 2 panels and allowed enough for fringe on the ends of about 4 inches on each end and used loom waste for the last fringe. My warp was 3 yards long. Finished measurements of each panel was 21 inches X 38-1/4 inches. This would depend entirely on your yarn, finishing, etc.
After you have woven and finished the panels, place the panels side by side and make an overcast stitch for 25 inches. Now, match the fringe of the front and back on the sides and overcast for 11 inches.
Of course, you can always make the panels wider and longer/more narrow for size. If you made them very long you would, basically, have a Hopi jacket. You can also do this on the machine just catching the selvages. When you put it on, the ends fold back so that you have this pretty lapel and fringe. If you use stripes in your warp it is very slimming from the back and the stripes on the front run kind of bias. Or use your hand dyed colorway for the warp and weave off with a tone-on-tone or solid so that the color runs vertically on the body. If you like, embellish the lapel with surface design and beading or a special pin.


Surface Design
 Are you a weaver with shaft envy? Have 4 shafts and want 8 or more? Not a weaver? Envy no more; you can add depth of texture, color and design with fabric paint.
 The scarf above was woven on a Atlantic Moonglow silk/rayon painted warp and weft of dark teal 8/2 tencel. Although, there are a lot of ways I could have surface-designed this scarf, I chose the easiest as my goal was to enhance the depth of texture and color; I was not striving for complete coverage as I wanted the structure and painted warp to be dominant.
In order to surface design properly, you first need a surface design board on which to work. The pad helps the fabric to accept the paint. My board is approximately 17" X 25" and layered with plywood, wool carpet padding and topped with plain muslin stretched, stapled and taped to the back. A temporary surface design board can be made with insulation foam, quilt batting, muslin and packing tape. Use an additional piece of fabric over your surface design board as you will use this again.
List of materials for this process:
Flexible printing plate
Foam core, wooden blocks or corrugated cardboard
AND/OR Speedy Stamp or EZ Cut Stamp Kit (includes cutting tools)
Speedy Stamp Blocks
Resist forms like berry baskets, large screen wire. Look around and you will see textured items in a whole new light.
Soft rubber brayer
Versatex printing ink (I used black as it will work on almost anything.)
Extender
Lumiere fabric paint in a metallic if desired
Freezer paper, plastic spoons
Prepare the fabric you plan to surface design by washing or wet-finishing suitable for the fabric and finish. I recommend Professional Textile Detergent (gift with purchase through September 30, 2008). Do not use fabric softener or dryer sheets prior to surface-designing. You may do so afterwards if you like.
Freezer paper works well as a place to mix fabric paint for applying to a brayer. Take out a little extender and place on the freezer paper. Add some printing ink and mix with a spoon. No specific amounts are required; use mostly extender with a little paint. You will get the feel for it after working with it. The extender will keep the fabric supple; additionally, on light colored fabrics will lighten the color, i.e., lots of extender and dab of paint will give a pastel on white. Roll just a little bit on the side of the paper with the brayer until you have an even coat on the brayer and apply to stamp. Place your scarf or piece to be surface-designed on the design board and stamp. Finely detailed commercial stamps will work but not as well as one you carve. Hand-carve your initials or logo for a one-of-a-kind look. If you'd rather not carve or want to try something additional, you can use flexible printing plate, cut into different shapes, peel off the back and adhere to a base like foam core, wooden block or corrugated cardboard to create your own stamp.
I generally surface-design one side of a scarf with Versatex/stamps and go back over it with highlights of copper using a clean brayer and resist forms. Stir and pour out a little Lumiere onto clean freezer paper. Place your resist(s) over the item to be surface-designed and roll the brayer directly over it. (Before you do this, take a deep breath and hold it.
Allow one side of your fabric to dry 24 hours and then surface-design the other side. Dry for another 24 hours and heat wet with a dry iron. Cover with a pressing cloth and set your iron on high and press for 30 seconds on every piece of the fabric. Some toss it in the dryer but I have more confidence with the iron. After that, it is set and can be washed, fabric softener added, etc.
There are many other options you can use with fabric paint such as stencils, silk-screening, transfers or mono-prints, etc., but this method is easy and effective with any fabric and especially handwovens.
It takes a little courage the first time you print onto handwoven fabric but is quite addictive after the first time as the depth of texture and color is further enhanced. If you're a little nervous, try it on commercial fabric first - and I think you will want to keep the commercial fabric for a quilting project.
Source of supplies:
Some local art supplies have stamp kits, additional blocks and printing plates. However, I was unable to find Versatex or Lumiere locally and purchased it from Dharma Trading Co., San Rafael, CA.
This should be called the everything scarf.

Weaving Treadling Options - Crackle Snippet
Recently, I pulled out the Crackle sampler I wove several years ago as part of Teaching and Learning through Correspondence with HGA and thought I would share a few pictures of my treadling option favorites or "snippets" from the sampler. Samplers have taught me a lot about pattern weaving. I encourage you to warp your loom with 3 to 5 yards and at least 3 repeats, thread up with twill, Crackle or Overshot and find out what works and what doesn't.
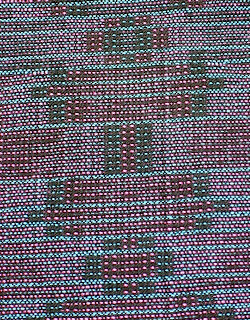
8-shaft Classic Crackle
The pattern above is threaded in Crackle/Pointed Twill fashion. It could just as well have been threaded using any other twill fashion. Threading for blocks: A=1232; B=2343; C=3454; D=4565; E=5676; F=6787; G=7818; H=8121. A transition thread was threaded between blocks. Each block was threaded 3 times. There are 8 blocks in both threading and treadling (shown below in the manner the blocks are treadled).
Two ground wefts, one pattern weft.
Legend: GW=Ground Weft; A through H=Block; P=Pattern Weft
Block A
H-GW1
A-PW
B-GW2
A-PW
H-GW1
A-PW
B-GW2
A-PW
-----
H-GW1 (Transition to next block.)
Block B
A-GW1
B-PW
C-GW2
B-PW
A-GW1
B-PW
C-GW2
B-PW
-----
A-GW1 (Transition to next block.)
Block C
B-GW1
C-PW
D-GW2
C-PW
B-GW1
C-PW
D-GW2
C-PW
-----
B-GW1 (Transition to next block.)
Block D
C-GW1
D-PW
E-GW2
D-PW
C-GW1
D-PW
E-GW2
D-PW
-----
C-GW1 (Transition to next block.)
Block E
D-GW1
E-PW
F-GW2
E-PW
D-GW1
E-PW
F-GW2
E-PW
-----
D-GW1 (Transition to next block.)
Block F
E-GW1
F-PW
G-GW2
F-PW
E-GW1
F-PW
G-GW2
F-PW
-----
E-GW1 (Transition to next block.)
Block G
F-GW1
G-PW
H-GW2
G-PW
F-GW1
G-PW
H-GW2
G-PW
-----
F-GW1 (Transition to next block.)
Block H
G-GW1
H-PW
A-GW2
H-PW
G-GW1
H-PW
A-GW2
H-PW
-----
G-GW1(Transition to next block.)
This requires a little concentration to weave but a lot of fun and worth the effort. In the right weight materials, such as 8/2 tencel, it would make a nice shawl or, in a heavier yarn, a nice jacket fabric.

8-shaft Classic Crackle


The pattern above is threaded in Crackle/Pointed Twill fashion. It could just as well have been threaded using any other twill fashion. Threading for blocks: A=1232; B=2343; C=3454; D=4565; E=5676; F=6787; G=7818; H=8121. A transition thread was threaded between blocks. Each block was threaded 3 times. There are 8 blocks in both threading and treadling (shown below in the manner the blocks are treadled).
Two ground wefts, one pattern weft.
Legend: GW=Ground Weft; A through H=Block; P=Pattern Weft
Block A
H-GW1
A-PW
B-GW2
A-PW
H-GW1
A-PW
B-GW2
A-PW
-----
H-GW1 (Transition to next block.)
Block B
A-GW1
B-PW
C-GW2
B-PW
A-GW1
B-PW
C-GW2
B-PW
-----
A-GW1 (Transition to next block.)
Block C
B-GW1
C-PW
D-GW2
C-PW
B-GW1
C-PW
D-GW2
C-PW
-----
B-GW1 (Transition to next block.)
Block D
C-GW1
D-PW
E-GW2
D-PW
C-GW1
D-PW
E-GW2
D-PW
-----
C-GW1 (Transition to next block.)
Block E
D-GW1
E-PW
F-GW2
E-PW
D-GW1
E-PW
F-GW2
E-PW
-----
D-GW1 (Transition to next block.)
Block F
E-GW1
F-PW
G-GW2
F-PW
E-GW1
F-PW
G-GW2
F-PW
-----
E-GW1 (Transition to next block.)
Block G
F-GW1
G-PW
H-GW2
G-PW
F-GW1
G-PW
H-GW2
G-PW
-----
F-GW1 (Transition to next block.)
Block H
G-GW1
H-PW
A-GW2
H-PW
G-GW1
H-PW
A-GW2
H-PW
-----
G-GW1(Transition to next block.)
This requires a little concentration to weave but a lot of fun and worth the effort. In the right weight materials, such as 8/2 tencel, it would make a nice shawl or, in a heavier yarn, a nice jacket fabric.
Weaving Treadling Options - Feather Stitch
Feather Stitch is a treadling option that Barbara Miller shared with me and basically, it uses two pattern shots to one of tabby. For a contemporary feel, use a dark warp and tabby in size 8/2 tencel, for example, and bright pattern weft such as 5/2 perle cotton. Follow twill sequence as follows:
2-3 Pattern (P)
2-4 Tabby (T)
2-3, 3-4 P
1-3 T
3-4, 4-1 P
2-4 T
4-1, 1-2 P
1-3 T
1-2 P
Repeat.
2-3 Pattern (P)
2-4 Tabby (T)
2-3, 3-4 P
1-3 T
3-4, 4-1 P
2-4 T
4-1, 1-2 P
1-3 T
1-2 P
Repeat.
Weaving Treadling Options - Honeycomb Fashion
Learned from Barbara Miller - my overshot mentor
This is a fun treadling option to use on a lot of threadings but I love it treadled on a overshot threading. Cells are woven in a finer thread; may I suggest 8/2 tencel? And the outline should 4 to 5 times larger than the cell thread. A suggestion would be to use black 8/2 tencel for warp and ply the same in about 4 or 5 strands for the outline. For a more interesting fabric, use 3 or 5 (or other odd number) bright colors of 8/2 tencel for the 4 blocks of cells. The colors will show up in different blocks. This makes a great purse fabric. It may need lining for stability and to protect the floats on the reverse side.
Pattern Blocks or Cells
A - 1, 3 & 4 (no 2)/1, 2 & 4 (no 3)
B - 1, 2 & 4 (no 3)/1, 2 & 3 (no 4)
C - 1, 2 & 3 (no 4)/2, 3 & 4 (no 1)
D - 2, 3 & 4 (no 1)/1, 3 & 4 (no 2)
Weave as follows:
1 & 3 - Outline
2 & 4 - Outline
Block A (from above.) Repeat 5 times (or no less than 3 times.)
2 & 4 - Outline
1 & 3 - Outline
Block C (from above.) Repeat 5 times (or no less than 3 times.)
Take-up in both warp and weft are great in this treadling order. Change color as you change cells. Alternate treadling of 2 blocks, all 4 or A & C; then B & D. Try 3 cell colors on 4 blocks. Try 1 shot of tabby rather than 2 before and after cells.
Weaving Treadling Options - More Summer & Winter
Occasionally, I feel a reminder is in order of how I "think" Overshot.
Four-shaft overshot consists of 4 blocks: A = 1 & 2; B = 2 & 3; C = 3 & 4 and D = 4 & 1. The blocks are threaded sequentially, i.e., A, B, C, B, C, D, and share a common thread between sequential blocks. Since looms vary from jack-style, counterbalance or countermarche, it is easier for explanation purposes to work with a direct tie-up, i.e., 1 treadle to 1 shaft. Think of covering the blocks or weaving the blocks when weaving the pattern rather than treadle numbers or treadle orders which really don't mean anything if you don't know what they are tied to. A tabby shot of 1 & 3 and 2 & 4 alternate with pattern shots. And, yes, I weave tabby with 2 feet!
This treadling, like the others, is on a Overshot threading. And I learned this treadling from Barbara Miller.
1 Pattern weft (P) and 1 Tabby weft (T)
Repeat each block 3 times starting with Block 1, Block 2, Block 1, etc.
Block 1 Block 2
A-1 & 2 (P) C-3 & 4 (P)
1 & 3 (T) 1 & 3 (T)
B-2 & 3 (P) D-4 & 1 (P)
2 & 4 (T) 2 & 4 (T)
B-2 & 3 (P) D-4 & 1 (P)
1 & 3 (T) 1 & 3 (T)
A-1 & 2 (P) C-3 & 4 (P)
2 & 4 (T) 2 & 4 (T)
Variation of above - Repeat blocks in a 4X, 2X, 4X, 2X, 4X sequence.
Block 1 Block 2
B-2 & 3 (P) D-4 & 1 (P)
C-3 & 4 (P) A-1 & 2 (P)
1 & 3 (T) 1 & 3 (T)
C-3 & 4 (P) A-1 & 2 (P)
B-2 & 3 (P) D-4 & 1 (P)
2 & 4 (T) 2 & 4 (T)
One could spend quite a while on Summer and Winter and not get through exploring!
Update: for picture examples of this type treadling on a Crackle threading, see Overshot and Other Pattern Weaving.
Weaving Treadling Options - More Polychrome
Pattern (2 colors of the same size), tabby
A. From Mary Snyder:
Block Color
D 1
C 2
A 1
B 2
1. Use one shot of each with tabby. Repeat.
2. Use tabby after each pair. Repeat.
3. Use tabby after each pattern pick and weave in pairs but use this
treadling sequence:
Block Color
D 1
Tabby
C 2
Tabby
C 2
Tabby
A 1
Tabby
B 2
Tabby
B 2
Tabby
B. From Barbara Miller and Susan Wilson
1. Pattern (2 colors) and tabby
Block Color
A 1
B 2
Tabby
A 1
B 2
Tabby
----------
B 1
C 2
Tabby
B 1
C 2
Tabby
----------
C 1
D 2
Tabby
C 1
D 2
Tabby
----------
D 1
A 2
Tabby
D 1
A 2
Tabby
----------
Try treadling A X 2, B X 2, C X 2, D X 2, C X 2, B X 2, A X 2
2. Pattern (4 colors - 1 for each block) and tabby
A. Try A, B, Tabby, A, B, Tabby
B. Try C, D, Tabby, C, D, Tabby
C. Try A, B, Tabby, C, D, Tabby
f
For picture examples of this type treadling on a Crackle threading, see Overshot and Other Pattern Weaving.
Weaving Treadling Options - Converting a Twill Pattern to Four-Shaft Overshot
Let's consider how to convert your favorite twill to 4-shaft overshot. It has been said that overshot and crackle are sisters and twill is their mother. Basically, overshot and crackle are derivatives of twill. In 4-shaft overshot, 1 & 2 = A, 2 & 3 = B, 3 & 4 = C and 4 & 1 = D and like twill, blocks are threaded sequentially unless threaded on opposites (another story..). Consider a pointed twill threaded 1-2-3-4-3-2 and balanced with 1. For overshot, increase the blocks to 121(2)32(3)43[(4)1(4)]34(3)23(2)12 and balance with 1. The common thread between blocks is noted by parentheses ( ) and the turning block by a bracket [ ]. Remember, that turning blocks are written with a odd number of ends and treadled with an even number. You may increase the size of blocks to any number but consider the size of the float based on number in the block and sett. You may change the blocks so that they aren't all the same size. And, then, as with other overshot patterns, use tabby. It is a lot of fun to do if you have a fiber program and can play with the myriad of options.
Weaving Treadling Optionns - Summer & Winter
This one is from Mary Snyder and requires one tabby and four pattern wefts. This example is made up with two bocks but could be more. The letters under the blocks represent 4-shaft overshot blocks: A = 1 & 2, B = 2 & 3, C = 3 & 4 and D = 4 & 1. Think of these as covering the blocks. Example: With a jack loom, if you are weaving A, you would lift 3 & 4 to cover 1 & 2. Repeat to square the block or 3 or 4 times each block.
Block 1 Block 2
D-Color 1 C-Color 3
Tabby Tabby
A-Color 2 B-Color 4
Tabby Tabby
A-Color 2 B-Color 4
Tabby Tabby
D-Color 1 C-Color 3
Tabby Tabby
Variations of the above:
Use two colors of pattern weft and include a metallic with the color. Treadle colors as in Block 1.
Use one color for Block 1 and one color for Block 2. Again, you may use metallics with your pattern weft.
Treadle one block only and use value-graded yarns as pattern weft.
These are only a few of the Summer and Winter options to try. I'll show more in the next newsletter.
For picture examples of this type treadling on a Crackle threading, see Overshot and Other Pattern Weaving.
Weaving Treadling Options - Shadow Fashion
Note: this is not shadow weave. It's a treadling option I learned from Barbara Miller.
Pattern and tabby
You may weave tromp as writ or rose fashion (Issue #8). Use tabby for the pattern thread and the pattern thread for the tabby.
Or use Mary Snyder's method.
Pattern and tabby (2)
Use 2 picks of tabby between each pattern pick in a finer yarn, one as the warp color, the other in a contrasting color; this should be a good contrast with pattern color.
Weaving Treadling Options - Polychrome
There are many ways to do this and I will show you one of Mary Snyder's to try on an overshot treadling. For those of you just joining us, start at the beginning of treadling options at Tromp as Writ.
Pattern (2 color of the same size), tabby
Block D-Color 1
Tabby
Block C-Color 2
Tabby
Block C-Color 2
Tabby
Block A-Color 1
Tabby
Block B-Color 2
Tabby
Block B-Color 2
Tabby
This is one repeat of the Mary Ann Ostrander threading that is from A Handweaver's Pattern Book by Marguerite Davison, p. 146. Balance with the first 17 ends.

Weaving Treadling Options - Shadow Fashion
This is not to be confused with Shadow Weave but is a nice treadling option to try with an overshot treadling. This is one that Barbara Miller, my mentor, taught me during Teaching and Learning through Correspondence (TLC), 1993-1994.
As an option, try Mary Snyder's suggestions for Shadow Fashion.
Shadow Fashion/Barbara Miller
Pattern and tabby
Weave tromp as writ or another treadling. Use tabby for the pattern thread and pattern thread for the tabby.
Shadow Fashion/Mary Snyder
Pattern and tabby (2)
Use 2 picks of tabby between each pattern pick in a finer yarn, one as the warp color, the other in a contrasting color; this should be a good contrast with pattern color.
Weaving Treadling Options - Proportion Change
Tromp as Writ, Rose or Other
Pattern and tabby
Weave with a pattern and tabby in your choice of tromp as writ, rose or other treadling but weave 2 picks of tabby between pattern.
Ex: Pattern/1-3, 2-4/ Pattern/1-3, 2-4
Pattern and tabby
Weave with a pattern and tabby in your choice of tromp as writ, rose or other treadling but weave 2 picks of tabby between pattern.
Ex: Pattern/1-3, 2-4/ Pattern/1-3, 2-4
Weaving Treadling Options - Twills
Here are a few to try:
Straight twill, no tabby: 2 & 3, 3 & 4, 4 & 1, 1 & 2 or for "block thinkers" - B, C, D, A. This is a good one to use to check out your threading for threading errors when you first begin treadling an overshot piece.
Twill on opposites, no tabby: 2 & 3/1 & 4, 3 & 4/1 & 2, 4 & 1/2 & 3, 1 & 2/3 & 4 or B/D, C/A, D/B, A/C. This is easier to think about on a direct tie-up as whichever treadles your feet are not on are the opposites!
Reverse twill, no tabby: 2 & 3, 3 & 4, 4 & 1, 1 & 2, 4 & 1, 3 & 4, 2 & 3 or B, C, D, (A), D, C, B. See the turning block at A? Leave off the last B in the repeat but include it as the last pick for balance.
Broken Twill, no tabby: 4 & 1, 2 & 3, 3 & 4, 1 & 2 or D, B, C, A.
Broken Twill, with tabby: This is the same treadling as above but with tabby inserted after every "block." Example: D, 1 & 3, B, 2 & 4, C, 1 & 3, A, 2 & 4.
Try any of your favorite twill treadlings as well as the ones shown here and enjoy!
Weaving Treadling Options - On Opposites
Pattern (2 colors of same size, no tabby)
This is particularly nice with high contrasting perle cottons for pattern wefts. You can use any treadling such as tromp as writ or rose and instead of the tabby following the pattern you will treadle the opposite block with the same-sized yarn in a different color. This is particularly easy to do if you are weaving with a 4-shaft direct tie-up (one shaft tied to one treadle woven with both feet). The opposite block will be the 2 treadles that your feet are not on at the time. (-: Another reason that I am a proponent of direct tie-up on 4-shaft overshot!
Opposites in 4 shaft overshot are as follows:
A = 1 & 2 Opposite = C - 3 & 4
B = 2 & 3 Opposite = D - 4 & 1
C = 3 & 4 Opposite = A - 1 & 2
D = 4 & 1 Opposite = B - 2 & 3
Below is the Opposites treadling of the Mary Ann Ostrander pattern, p. 146 of A Handweavr's Pattern Book. The example will be shown in the tromp as writ treadling with the opposite block in parentheses in order that you may see it "side-by-side." But, rose, a twill progression or any order may be used. Where the original pattern shows more than one pattern pick, such as C2, A2, etc., then follow with the opposite pattern pick for the number of original pattern picks.
Tromp as writ/Opposites:
A1 (C), B1 (D), C2 (A), B1 (D), A1 (C)
D1 (B), C2 (A), D1 (B)
A1 (C), B1 (D), C2 (A), B1 (D), A1 (C)
D1 (B), C1 (A), B1 (D), A3 (C), D3 (B), C5 (A), B4 (D), C2 (A), B4 (D), C2
(A), B4 (D), C5 (A), D3 (B), A3 (C), B1 (D), C1 (A), D1 (B)
Balance with the first 3 lines. Or thread and weave as shown, balancing threading with the first 17 ends.

Weaving Treadling Options - Rose Fashion
Pattern and tabby
Only patterns that contain star figures can be woven rose fashion. A star is similar to a table, having 2 alternating blocks. Usually there are 5 sections with the center block being smaller than the outside blocks. The treadling order is converted within the motifs. Change must start from the turning block of a star. An example is shown in the following cross to illustrate how 4 blocks would change throughout the pattern.
STAR A B C (D) C B A
TO
ROSE B A D (C) D A B
I will give you the rose treadling of the Mary Ann Ostrander pattern, p. 146 of A Handweavr's Pattern Book. First, I will show the tromp as writ treadling in order that you may see it side-by-side.
Tromp as writ:
A1, B1, (C2), B1, A1
D1, (C2), D1
A1, B1, (C2), B1, A1
D1, C1, B1, A3, D3, C5, (B4), (C2), (B4), (C2), (B4), C5, D3, A3, B1, C1, D1
Balance with the first 3 lines.
Rose:
B1, A1, (D2), A1, B1
C1, (D2), C1
B1, A1, (D2), A1, B1
C1, D1, A1, B3, C3, D5, (A4), (D2), (A4), (D2), (A4), D5, C3, B3, A1, D1, C1
Balance with the first 3 lines. Here's how it would look If using this threading, balance with the first 17 and balance treadling with the first 16.

Weaving Treadling Options - Squaring an Overshot Pattern
A few have asked me lately on which block do you square? Good question; I had it once too. A tromp as writ pattern when woven correctly should be at a 45 degree angle starting at the right hand corner block. This is to insure that circles are round rather than looking like flat tires or Easter eggs. (-: Blocks run sequentially, sharing a common thread. If the first "block" woven is A, then the next would be B or D and share a common thread with that first right hand corner block. There are several things that determine a pattern being square. These include sett, beat, yarns, finishing and individual weaver; I'm sure I've left out a few. A pattern that is not square by tromp as writ can be squared by subtracting pattern picks in *some* places. I say *some* because care needs to be taken in order not to lose the integrity of the pattern. Also, turning blocks should always have an even number of pattern picks. I call this Barbara Miller's Rule #1; thank you, Barbara. If you're in question as to what the "rule" refers to, see Tromp as Writ.
Some coverlet weavers include an extra yard for weaving a sample, then wet-finishing to determine the number of picks to subtract. Of course, this means cutting off, retying, etc., but, it does work. Looking at the corner right hand block, you would determine how many pattern picks need to be subtracted from that corner block to make that corner block square. Then, look at the next block that runs at an approximate 45 degree angle up and to the left and do the same thing, remarking your original tromp as writ treadling.
Here's my way and it works most of the time for me as I have a, generally, even beat. (Everyone's is different.) I include some extra for sampling - yes, the "s" word. *However,* I weave enough of the border and the pattern by my tromp as writ treadling to determine whether it's going to be square. Then, *without tension* I place the center of a protractor over that first right hand corner block and see what degree of angle I have going. I figure in about 10% shrinkage and if the angle is 49.5 degrees it is going to be close when it is wet-finished. If it's more, which it usually is, I set the protractor at 49.5 degrees and count the number of pattern picks over the 49.5 degree mark and subtract within individual blocks of the treadling order. No, I don't like the "s" word either; that's the reason I use this method.
Here is an exercise I did using Fiberworks PCW to give an example of squaring. The tromp as writ pattern now has a 49 pick repeat as opposed to a 61 pick repeat. You can probably tell that I removed picks from the table or last motif. The square appears to be flat in the drawdown because the fiber program is a perfect world and does not take the necessity of squaring into account. You will note that I was very careful to leave the turning block an even number and subtracted from the blocks on either side of the center. I also did not subtract from transitional blocks, those having only 2 threads in the block.

Overshot and Other Pattern Weaving
Overshot and other pattern weaving have been a fascination to me over the years as there are so many possibilities for design and use. I've posted a few pictures here of some of my pattern weaving.
If in doubt about what treadling option will work for your project, beam a warp from 3 to 5 yards and at least 3 repeats (to see what pattern shows up between repeats) and try lots of treadling options. The "snippets" shown below are from 2 Crackle samplers that I wove during Teaching and Learning through Correspondence/HGA with Mimi Smith. References are given of whom I have knowledge.
This is a portion of an 8-shaft sampler I wove. The warp was 3 yards long. You will note the long floats of a few options; it's good to know what doesn't work as well as what will.

This is one of my favorites from the 8-shaft sampler and is Classic Crackle/Susan Wilson. It would have had more pizzazz if I had treadled all 8 blocks.

This was toward the end of the 4-shaft sampler. It is Italian Style/Nancy Lyons.

Classic Crackle/Susan Wilson from the 4-shaft sampler.

Classic Crackle/Susan Wilson from the 4-shaft sampler.

Two-block/Opposites-Type Treadling from the 4-shaft sampler.

Honeycomb Fashion/Barbara Miller from the 4-shaft sampler. I learned this option during 1994 TLC/Overshot with Barbara.

Two different Polychrome blocks/Mary Snyder from the 4-shaft sampler.
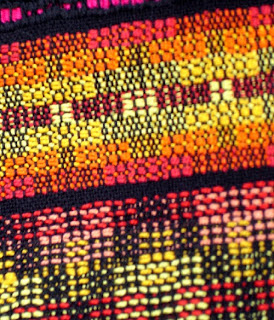
Summer and Winter/Mary Snyder from the 4-shaft sampler.

Italian Fashion/Barbara Miller from the 4-shaft sampler.

Changes in the Sizes of Blocks/Mary Snyder from the 4-shaft sampler.

Polychrome/Barbara Miller/Susan Wilson from the 4-shaft sampler.

This is a pillow top I wove several years ago; it was one of my first attempts at using several colors in pattern weaving. You can see that the method I used is a "cheap" way of doing it. I soon found out it is far more effective to blend as in the Flourishing Wave wallhanging below. However, nothing ventured, nothing gained. We often learn more from "mistakes" than when things turn out exactly as planned. And, there was enough hand dyed, value graded yarns left from this project to contribute to the project below.
The warp and tabby is 10/2 perle cotton in solid moss green. The pattern wefts are 5/2 hand dyed value-graded perle cotton in 4 values of plum. From the right side of the picture, I threaded the left side of the blooming leaf twice and then threaded the right side of the leaf twice and treadled as written. I used the same reversal in threading in the star ornament below in order to accent the star. It is fun to move motifs around or thread and treadle a sample with at least repeats in order to see what goes on between the motifs. Then, enlarge or miniaturize or try different treadlings. If miniaturizing, pay close attention to blocks you reduce so as not to compromise the integrity of the design.

Flourishing Wave threading/tromp as writ treadling - Warp and tabby is 10/2 perle cotton in value-graded commercially-dyed blacks and grays. This was the second in a series so, therefore, squared. The pattern wefts are 5/2 hand dyed value-graded perle cotton in 2 hues, 4 values each. The interesting thing about it that does not show up too well in the picture is that I began warping on the far left in black and moved all the way to silver on the right and the same with tabby. The value-graded pattern wefts move from dark at the bottom to light at the top so that the bottom left corner is the darker, more intense corner and the top right is the lighter, less intense corner.

This is a Lee's Surrender runner that is on the gallery page. Warp and tabby are 10/2 perle cotton. Pattern weft is wool. This, too, is tromp as writ but very traditional. I think these first two show the wide range of overshot just in tromp as writ, 4-shaft.

The picture of "Orange Blossom Special" is a little distorted as it was taken from a slide. This is another tromp as writ treadling woven on a Wahoo Blossom threading. The warp and tabby are an olive drab 10/2 perle cotton with 8 or 9 colors of 5/2 perle cotton as pattern weft. As you can tell, the pattern is not squared but it does not necessarily have to be in contemporary overshot weaving.

White House Blue Room Christmas tree ornament, 1999 - This was cut from the center of 4 intersecting leaf motifs for each side, then sewn and stuffed with hand twisted cord. 20/2 perle cotton warp and tabby and 10/2 perle cotton pattern weft.
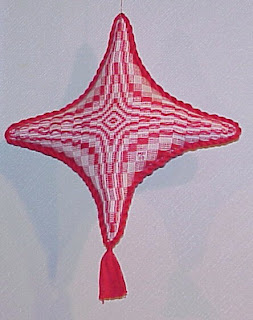
Wheel of Fortune runner - This was woven for Carrie Ledlow's future bridal table. She was 7 years old when I wove this. 20/2 perle cotton warp and tabby/linen pattern weft.

Crackle Shawl - This was threaded in a Crackle/pointed twill fashion and woven off tromp as writ. The warp and pattern weft are black 8/2 tencel® with alternating tabbies of red purple and ruby 8/2 tencel®. The interesting thing about it that doesn't show up in the picture is that the pattern blocks appear to be navy and the shawl is iridescent; depending on the direction it is seen, it will appear to be red purple, navy, black or ruby. It originally was going to be a Crackle beach towel woven off with hand painted cotton chenille and became a shawl on the loom.

Summer and Winter runner - This is a runner I wove several years ago and in a private collection. The structure is summer and winter with blocks of different sizes both in warp and weft. The warp and tabby are black silk noil. The weft is hand dyed, space-dyed silk bombyx.

Next up - Weaving Treadling Options
Warping a Loom Back to Front - Part 7
Weaving and Finishing
A few tips in weaving prettier fabric:
Weave in small increments such as an inch or a small repeat midway between the breast beam and beater. If you try to get the most out of an advance of the warp by weaving right up next to the breast beam and all the way to the beater, your edges will be uneven due to the differentiation of the weft arc.
Don't handle the selvages. It will change the tension and the selvages will wave lengthwise when you take it off the loom and will not come out with wet-finishing.
Maintain an even beat and develop a rhythm.
When you leave the loom for a period more than a few hours, release the tension on your warp. When you return to weave, adjust the tension. Prior to throwing the first pick, beat once lightly on a closed shed. (The last pick will have traveled just a little so that you will be able to see it off the loom.) Open the next shed and throw a pick.
Step 61: When you reach the end of a bobbin, overlap in the same shed by a few bobbins and continue. If you're weaving with a hand painted, variegated yarn, begin weaving with the same color of the end of the last bobbin. This is particularly true if you're working with a directional colorway like the ones I paint as the color will continue in the same direction.

Step 62: This is a close-up of the step above. You will leave these ends until you have washed your scarf.

Step 63: Final end hem-stitched and the fabric is off the loom. See the weft ends that were overlapped? When the scarf is wet-finished and completely dry, these ends will be trimmed off next to the fabric.

Step 64: This picture shows both sides of the fabric. There is really no wrong side. But the side on the left was the one facing up on the loom when hem-stitched. Hem-stitching looks a little different on the opposite side. So, I recommend twisting on the same side of the fabric. The white spots you see are in the loom waste. I could have decided to trim the fringe shorter but most likely, when the fringe is twisted, it will barely be noticed and won't bother me.

Step 65: Close-up picture of hem-stitching and twisted fringe.

Step 66: Picture of finished stole after wet-finishing and a good hard-press.

Warping a Loom Back to Front - Part 6
Tying On
There are many ways to tie on to the front. This happens to be my favorite but I do use other ways depending on the type yarn.
Step 49: Hold a warp bundle tight with one hand. With the other, split the bundle in half from the bottom, making a larks-head loop. Take a section of yarn from the second rod and insert in the loop, pulling so that it is snug. But do not try to tension at this point. Go from one side to the other and the middle tying on until you have all bundles tied. Before applying tension, tie the first rod to the second starting at one edge of the scarf to the other edge. Tighten tension on the loom some so that you don't have to do all the tensioning by hand.

Step 50: Now, pull up on the yarns on the second rod to finish adjusting tension.

Step 51: Tie-up the treadles. For a four-shaft loom with six treadles, you might want to tie up the treadles on the ends for plain weave with left treadle to the first and third shafts from the front and right treadle to the second and fourth shafts from the front. Reserve the four in the center for a twill tie-up. Beginning at the left, tie second treadle to first and second shaft, third treadle to second and third, fourth treadle to third and fourth and fifth treadle to first and fourth. Personally, I enjoy a direct tie-up or one shaft tied to one treadle and weave with two feet. It is easier on feet, knees and hip joints and as long as you are weaving on four shafts, retying the loom is unnecessary.

Step 52: Time to spread or close up the warp. This is the quickest manner to do it. With a slick, smooth yarn in your shuttle, tie a knot onto the rod holding the warp.

Step 53: Throw about three picks, wrapping the weft around the ends of the rod with each pick. Do not beat until after the third pick.

Step 54: Then, beat on a closed shed.

Step 55: The warp is not quite closed. Throw three more picks in the same manner as above.

Step 56: Beat on a closed shed.

Step 57: Throw three more picks.

Step 58: Beat on a closed shed. Now, it appears to be completely spread or closed and ready to begin weaving.
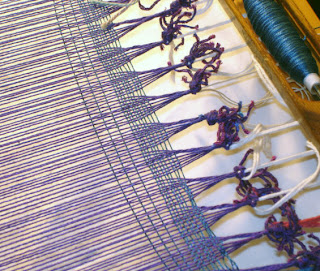
Step 59: Leave space for fringe. Some weave this space but I have found that it is unnecessary. If you care to hem-stitch, start weaving on the right if you're right-handed and on the left if you're left-handed. Leave a tail of three or four times the width of the warp to hem-stitch and weave a couple of inches. Since I don't have an apron on my loom, I place white fabric underneath the warp so that I can see better to hem-stitch.

Step 60: Hem-stitching completed. Continue to weave.

Next - overlapping beginning and ending of weft.
Subscribe to:
Posts (Atom)

