Warping a loom from back to front is the favored method of many handloom weavers. It preserves the tension so carefully maintained in the measuring process. In addition, the warp only travels through the heddles and reed once so that there is less abrasion of the warp.
This is the beginnings of warping a pre-wound painted warp from back to front. There are a lot of different ways to warp a loom and I don't profess to know them all. Nor, do I know about every loom. This is a 4-shaft Schacht Baby Wolf which is a jack-style loom and the steps shown here are what work best for me with this loom. Occasionally, I will use different methods of tying on depending on the type yarn I'm using. The yarn in this warp is a cotton/rayon that I dyed when I owned Heritage Yarns.
Assuming your warp is wound as is this pre-wound, painted warp, beaming the warp is the next step in the process. Occasionally, I will add to these pages and hope that if you have any questions about the process I use, you will contact me at handdyer@comcast.net.
When weaving doesn't seem to be going your way, read the notes from Bill Koepp below and know that we all occasionally experience fabric that doesn't live up to our expectations. Generally, I have learned a lot more from these times than when everything goes as planned.
Happy weaving,
Margaret
A Weaver's Whimsey
1. Whatever the tie-up is, there's probably a better one.
2. If anything can mess up the warp, it probably will.
3. Whatever the draft is, there'll be someone who will misinterpret it.
4. Even if it's very hard to come up with the wrong threading, a way will be found.
5. If the fell smiles, the weaver doesn't.
6. There are never too many bobbins, quills or shuttles.
7. Only your best or newest shuttle will hit the floor.
8. Errors will stay hidden until nine picks are thrown.
9. Most errors will pop up in the center of the fabric.
10. In your weaving notes the parts that are absolutely beyond any need of checking, have the mistakes.
11. Whatever color is chosen, it'll be out of fashion as soon as the project is finished.
Bill Koepp, CA
Friday, September 2, 2011

Friday, July 1, 2011
Finished Project
This is mostly finished but I am considering adding some white to the dog and/or a leaf close to the dog in order to balance color. It was a lot of fun to hook.


Monday, May 2, 2011
King of the Barnyard progress
This is my latest rug hooking project. The light was not that good so, the color is not representative. The light green is from a fiber swap at The Welcome Mat. I am using it to outline the animals. The remainder of the background will be in several light greens pictured below.


Saturday, April 23, 2011
Confederate Jasmine
This is the Confederate Jasmine (and California ivy) on our front porch. It's the first time it's bloomed and in the shade; it generally likes sun. it is climbing around the grapevine wreath with no help from me. I look forward to see it fully cover it.

Confederate Jasmine

Confederate Jasmine
See Rock City
Eventually, I hope to be more faithful in blogging. Retirement is so busy! These are two of the latest things I've hooked. You could say that I'm hooked on hooking; that would be putting it mildly! I drew both patterns, the Rock City pillow, a loose interpretation of an old illustration. There were so many See Rock Ciy signs on barns as I was growing up. We would see them on the way to the Smokies. I haven't seen one in years. The second image I have entitled God's Eye chairpaid as it felt southwestern to me when I finished. The title really followed the hooking. The only thing I drew was the largest circle in the middle, then, just started hooking.
The final picture is what I am hooking now. It is one I designed and have done a lot of the dyeing for it.

See Rocky City


God's Eye chairpad

King of the Barnyard
The final picture is what I am hooking now. It is one I designed and have done a lot of the dyeing for it.
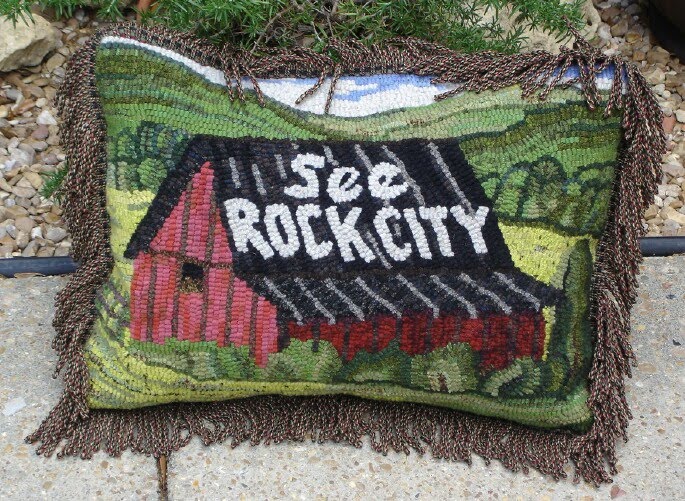
See Rocky City


God's Eye chairpad

King of the Barnyard
Wednesday, January 12, 2011
Stay warm
It is bitter cold here today. I remembered to pull out my corn bag and heat it in the microwave for 3 minutes. It's meant to drape around the neck but works well on cold feet. It's simply a cotton bag stitched in a swirl down the middle, filled halfway with dried corn. Try it; you'll like it.


Tuesday, January 11, 2011
This is the latest rug that I just completed hooking. It is a Bea Brock design. Bea color-planned and dyed the fabric for it as well. I enjoyed hooking it and scooting pictures around for a place to hang it.


Subscribe to:
Posts (Atom)

 Posts
Posts


