Here are a few to try:
Straight twill, no tabby: 2 & 3, 3 & 4, 4 & 1, 1 & 2 or for "block thinkers" - B, C, D, A. This is a good one to use to check out your threading for threading errors when you first begin treadling an overshot piece.
Twill on opposites, no tabby: 2 & 3/1 & 4, 3 & 4/1 & 2, 4 & 1/2 & 3, 1 & 2/3 & 4 or B/D, C/A, D/B, A/C. This is easier to think about on a direct tie-up as whichever treadles your feet are not on are the opposites!
Reverse twill, no tabby: 2 & 3, 3 & 4, 4 & 1, 1 & 2, 4 & 1, 3 & 4, 2 & 3 or B, C, D, (A), D, C, B. See the turning block at A? Leave off the last B in the repeat but include it as the last pick for balance.
Broken Twill, no tabby: 4 & 1, 2 & 3, 3 & 4, 1 & 2 or D, B, C, A.
Broken Twill, with tabby: This is the same treadling as above but with tabby inserted after every "block." Example: D, 1 & 3, B, 2 & 4, C, 1 & 3, A, 2 & 4.
Try any of your favorite twill treadlings as well as the ones shown here and enjoy!
Saturday, September 3, 2011

Weaving Treadling Options - On Opposites
Pattern (2 colors of same size, no tabby)
This is particularly nice with high contrasting perle cottons for pattern wefts. You can use any treadling such as tromp as writ or rose and instead of the tabby following the pattern you will treadle the opposite block with the same-sized yarn in a different color. This is particularly easy to do if you are weaving with a 4-shaft direct tie-up (one shaft tied to one treadle woven with both feet). The opposite block will be the 2 treadles that your feet are not on at the time. (-: Another reason that I am a proponent of direct tie-up on 4-shaft overshot!
Opposites in 4 shaft overshot are as follows:
A = 1 & 2 Opposite = C - 3 & 4
B = 2 & 3 Opposite = D - 4 & 1
C = 3 & 4 Opposite = A - 1 & 2
D = 4 & 1 Opposite = B - 2 & 3
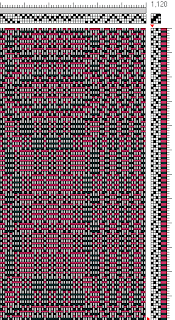
Below is the Opposites treadling of the Mary Ann Ostrander pattern, p. 146 of A Handweavr's Pattern Book. The example will be shown in the tromp as writ treadling with the opposite block in parentheses in order that you may see it "side-by-side." But, rose, a twill progression or any order may be used. Where the original pattern shows more than one pattern pick, such as C2, A2, etc., then follow with the opposite pattern pick for the number of original pattern picks.
Tromp as writ/Opposites:
A1 (C), B1 (D), C2 (A), B1 (D), A1 (C)
D1 (B), C2 (A), D1 (B)
A1 (C), B1 (D), C2 (A), B1 (D), A1 (C)
D1 (B), C1 (A), B1 (D), A3 (C), D3 (B), C5 (A), B4 (D), C2 (A), B4 (D), C2
(A), B4 (D), C5 (A), D3 (B), A3 (C), B1 (D), C1 (A), D1 (B)
Balance with the first 3 lines. Or thread and weave as shown, balancing threading with the first 17 ends.
This is particularly nice with high contrasting perle cottons for pattern wefts. You can use any treadling such as tromp as writ or rose and instead of the tabby following the pattern you will treadle the opposite block with the same-sized yarn in a different color. This is particularly easy to do if you are weaving with a 4-shaft direct tie-up (one shaft tied to one treadle woven with both feet). The opposite block will be the 2 treadles that your feet are not on at the time. (-: Another reason that I am a proponent of direct tie-up on 4-shaft overshot!
Opposites in 4 shaft overshot are as follows:
A = 1 & 2 Opposite = C - 3 & 4
B = 2 & 3 Opposite = D - 4 & 1
C = 3 & 4 Opposite = A - 1 & 2
D = 4 & 1 Opposite = B - 2 & 3
Below is the Opposites treadling of the Mary Ann Ostrander pattern, p. 146 of A Handweavr's Pattern Book. The example will be shown in the tromp as writ treadling with the opposite block in parentheses in order that you may see it "side-by-side." But, rose, a twill progression or any order may be used. Where the original pattern shows more than one pattern pick, such as C2, A2, etc., then follow with the opposite pattern pick for the number of original pattern picks.
Tromp as writ/Opposites:
A1 (C), B1 (D), C2 (A), B1 (D), A1 (C)
D1 (B), C2 (A), D1 (B)
A1 (C), B1 (D), C2 (A), B1 (D), A1 (C)
D1 (B), C1 (A), B1 (D), A3 (C), D3 (B), C5 (A), B4 (D), C2 (A), B4 (D), C2
(A), B4 (D), C5 (A), D3 (B), A3 (C), B1 (D), C1 (A), D1 (B)
Balance with the first 3 lines. Or thread and weave as shown, balancing threading with the first 17 ends.

Weaving Treadling Options - Rose Fashion
Pattern and tabby
Only patterns that contain star figures can be woven rose fashion. A star is similar to a table, having 2 alternating blocks. Usually there are 5 sections with the center block being smaller than the outside blocks. The treadling order is converted within the motifs. Change must start from the turning block of a star. An example is shown in the following cross to illustrate how 4 blocks would change throughout the pattern.
STAR A B C (D) C B A
TO
ROSE B A D (C) D A B
I will give you the rose treadling of the Mary Ann Ostrander pattern, p. 146 of A Handweavr's Pattern Book. First, I will show the tromp as writ treadling in order that you may see it side-by-side.
Tromp as writ:
A1, B1, (C2), B1, A1
D1, (C2), D1
A1, B1, (C2), B1, A1
D1, C1, B1, A3, D3, C5, (B4), (C2), (B4), (C2), (B4), C5, D3, A3, B1, C1, D1
Balance with the first 3 lines.
Rose:
B1, A1, (D2), A1, B1
C1, (D2), C1
B1, A1, (D2), A1, B1
C1, D1, A1, B3, C3, D5, (A4), (D2), (A4), (D2), (A4), D5, C3, B3, A1, D1, C1
Balance with the first 3 lines. Here's how it would look If using this threading, balance with the first 17 and balance treadling with the first 16.
Only patterns that contain star figures can be woven rose fashion. A star is similar to a table, having 2 alternating blocks. Usually there are 5 sections with the center block being smaller than the outside blocks. The treadling order is converted within the motifs. Change must start from the turning block of a star. An example is shown in the following cross to illustrate how 4 blocks would change throughout the pattern.
STAR A B C (D) C B A
TO
ROSE B A D (C) D A B
I will give you the rose treadling of the Mary Ann Ostrander pattern, p. 146 of A Handweavr's Pattern Book. First, I will show the tromp as writ treadling in order that you may see it side-by-side.
Tromp as writ:
A1, B1, (C2), B1, A1
D1, (C2), D1
A1, B1, (C2), B1, A1
D1, C1, B1, A3, D3, C5, (B4), (C2), (B4), (C2), (B4), C5, D3, A3, B1, C1, D1
Balance with the first 3 lines.
Rose:
B1, A1, (D2), A1, B1
C1, (D2), C1
B1, A1, (D2), A1, B1
C1, D1, A1, B3, C3, D5, (A4), (D2), (A4), (D2), (A4), D5, C3, B3, A1, D1, C1
Balance with the first 3 lines. Here's how it would look If using this threading, balance with the first 17 and balance treadling with the first 16.

Weaving Treadling Options - Squaring an Overshot Pattern
A few have asked me lately on which block do you square? Good question; I had it once too. A tromp as writ pattern when woven correctly should be at a 45 degree angle starting at the right hand corner block. This is to insure that circles are round rather than looking like flat tires or Easter eggs. (-: Blocks run sequentially, sharing a common thread. If the first "block" woven is A, then the next would be B or D and share a common thread with that first right hand corner block. There are several things that determine a pattern being square. These include sett, beat, yarns, finishing and individual weaver; I'm sure I've left out a few. A pattern that is not square by tromp as writ can be squared by subtracting pattern picks in *some* places. I say *some* because care needs to be taken in order not to lose the integrity of the pattern. Also, turning blocks should always have an even number of pattern picks. I call this Barbara Miller's Rule #1; thank you, Barbara. If you're in question as to what the "rule" refers to, see Tromp as Writ.
Some coverlet weavers include an extra yard for weaving a sample, then wet-finishing to determine the number of picks to subtract. Of course, this means cutting off, retying, etc., but, it does work. Looking at the corner right hand block, you would determine how many pattern picks need to be subtracted from that corner block to make that corner block square. Then, look at the next block that runs at an approximate 45 degree angle up and to the left and do the same thing, remarking your original tromp as writ treadling.
Here's my way and it works most of the time for me as I have a, generally, even beat. (Everyone's is different.) I include some extra for sampling - yes, the "s" word. *However,* I weave enough of the border and the pattern by my tromp as writ treadling to determine whether it's going to be square. Then, *without tension* I place the center of a protractor over that first right hand corner block and see what degree of angle I have going. I figure in about 10% shrinkage and if the angle is 49.5 degrees it is going to be close when it is wet-finished. If it's more, which it usually is, I set the protractor at 49.5 degrees and count the number of pattern picks over the 49.5 degree mark and subtract within individual blocks of the treadling order. No, I don't like the "s" word either; that's the reason I use this method.
Here is an exercise I did using Fiberworks PCW to give an example of squaring. The tromp as writ pattern now has a 49 pick repeat as opposed to a 61 pick repeat. You can probably tell that I removed picks from the table or last motif. The square appears to be flat in the drawdown because the fiber program is a perfect world and does not take the necessity of squaring into account. You will note that I was very careful to leave the turning block an even number and subtracted from the blocks on either side of the center. I also did not subtract from transitional blocks, those having only 2 threads in the block.

Some coverlet weavers include an extra yard for weaving a sample, then wet-finishing to determine the number of picks to subtract. Of course, this means cutting off, retying, etc., but, it does work. Looking at the corner right hand block, you would determine how many pattern picks need to be subtracted from that corner block to make that corner block square. Then, look at the next block that runs at an approximate 45 degree angle up and to the left and do the same thing, remarking your original tromp as writ treadling.
Here's my way and it works most of the time for me as I have a, generally, even beat. (Everyone's is different.) I include some extra for sampling - yes, the "s" word. *However,* I weave enough of the border and the pattern by my tromp as writ treadling to determine whether it's going to be square. Then, *without tension* I place the center of a protractor over that first right hand corner block and see what degree of angle I have going. I figure in about 10% shrinkage and if the angle is 49.5 degrees it is going to be close when it is wet-finished. If it's more, which it usually is, I set the protractor at 49.5 degrees and count the number of pattern picks over the 49.5 degree mark and subtract within individual blocks of the treadling order. No, I don't like the "s" word either; that's the reason I use this method.
Here is an exercise I did using Fiberworks PCW to give an example of squaring. The tromp as writ pattern now has a 49 pick repeat as opposed to a 61 pick repeat. You can probably tell that I removed picks from the table or last motif. The square appears to be flat in the drawdown because the fiber program is a perfect world and does not take the necessity of squaring into account. You will note that I was very careful to leave the turning block an even number and subtracted from the blocks on either side of the center. I also did not subtract from transitional blocks, those having only 2 threads in the block.

Overshot and Other Pattern Weaving
Overshot and other pattern weaving have been a fascination to me over the years as there are so many possibilities for design and use. I've posted a few pictures here of some of my pattern weaving.
If in doubt about what treadling option will work for your project, beam a warp from 3 to 5 yards and at least 3 repeats (to see what pattern shows up between repeats) and try lots of treadling options. The "snippets" shown below are from 2 Crackle samplers that I wove during Teaching and Learning through Correspondence/HGA with Mimi Smith. References are given of whom I have knowledge.
This is a portion of an 8-shaft sampler I wove. The warp was 3 yards long. You will note the long floats of a few options; it's good to know what doesn't work as well as what will.

This is one of my favorites from the 8-shaft sampler and is Classic Crackle/Susan Wilson. It would have had more pizzazz if I had treadled all 8 blocks.
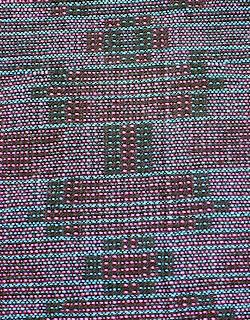
This was toward the end of the 4-shaft sampler. It is Italian Style/Nancy Lyons.

Classic Crackle/Susan Wilson from the 4-shaft sampler.

Classic Crackle/Susan Wilson from the 4-shaft sampler.

Two-block/Opposites-Type Treadling from the 4-shaft sampler.

Honeycomb Fashion/Barbara Miller from the 4-shaft sampler. I learned this option during 1994 TLC/Overshot with Barbara.

Two different Polychrome blocks/Mary Snyder from the 4-shaft sampler.
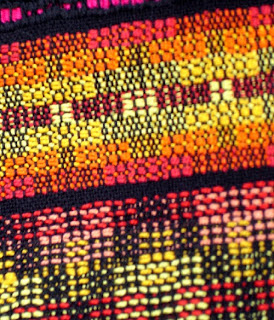
Summer and Winter/Mary Snyder from the 4-shaft sampler.

Italian Fashion/Barbara Miller from the 4-shaft sampler.

Changes in the Sizes of Blocks/Mary Snyder from the 4-shaft sampler.

Polychrome/Barbara Miller/Susan Wilson from the 4-shaft sampler.

This is a pillow top I wove several years ago; it was one of my first attempts at using several colors in pattern weaving. You can see that the method I used is a "cheap" way of doing it. I soon found out it is far more effective to blend as in the Flourishing Wave wallhanging below. However, nothing ventured, nothing gained. We often learn more from "mistakes" than when things turn out exactly as planned. And, there was enough hand dyed, value graded yarns left from this project to contribute to the project below.
The warp and tabby is 10/2 perle cotton in solid moss green. The pattern wefts are 5/2 hand dyed value-graded perle cotton in 4 values of plum. From the right side of the picture, I threaded the left side of the blooming leaf twice and then threaded the right side of the leaf twice and treadled as written. I used the same reversal in threading in the star ornament below in order to accent the star. It is fun to move motifs around or thread and treadle a sample with at least repeats in order to see what goes on between the motifs. Then, enlarge or miniaturize or try different treadlings. If miniaturizing, pay close attention to blocks you reduce so as not to compromise the integrity of the design.

Flourishing Wave threading/tromp as writ treadling - Warp and tabby is 10/2 perle cotton in value-graded commercially-dyed blacks and grays. This was the second in a series so, therefore, squared. The pattern wefts are 5/2 hand dyed value-graded perle cotton in 2 hues, 4 values each. The interesting thing about it that does not show up too well in the picture is that I began warping on the far left in black and moved all the way to silver on the right and the same with tabby. The value-graded pattern wefts move from dark at the bottom to light at the top so that the bottom left corner is the darker, more intense corner and the top right is the lighter, less intense corner.

This is a Lee's Surrender runner that is on the gallery page. Warp and tabby are 10/2 perle cotton. Pattern weft is wool. This, too, is tromp as writ but very traditional. I think these first two show the wide range of overshot just in tromp as writ, 4-shaft.

The picture of "Orange Blossom Special" is a little distorted as it was taken from a slide. This is another tromp as writ treadling woven on a Wahoo Blossom threading. The warp and tabby are an olive drab 10/2 perle cotton with 8 or 9 colors of 5/2 perle cotton as pattern weft. As you can tell, the pattern is not squared but it does not necessarily have to be in contemporary overshot weaving.
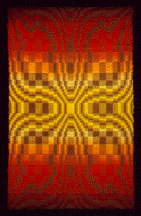
White House Blue Room Christmas tree ornament, 1999 - This was cut from the center of 4 intersecting leaf motifs for each side, then sewn and stuffed with hand twisted cord. 20/2 perle cotton warp and tabby and 10/2 perle cotton pattern weft.
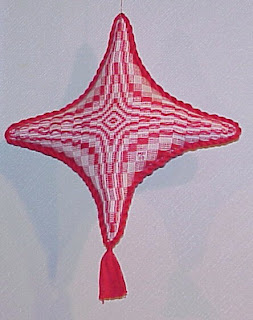
Wheel of Fortune runner - This was woven for Carrie Ledlow's future bridal table. She was 7 years old when I wove this. 20/2 perle cotton warp and tabby/linen pattern weft.

Crackle Shawl - This was threaded in a Crackle/pointed twill fashion and woven off tromp as writ. The warp and pattern weft are black 8/2 tencel® with alternating tabbies of red purple and ruby 8/2 tencel®. The interesting thing about it that doesn't show up in the picture is that the pattern blocks appear to be navy and the shawl is iridescent; depending on the direction it is seen, it will appear to be red purple, navy, black or ruby. It originally was going to be a Crackle beach towel woven off with hand painted cotton chenille and became a shawl on the loom.

Summer and Winter runner - This is a runner I wove several years ago and in a private collection. The structure is summer and winter with blocks of different sizes both in warp and weft. The warp and tabby are black silk noil. The weft is hand dyed, space-dyed silk bombyx.

Next up - Weaving Treadling Options
If in doubt about what treadling option will work for your project, beam a warp from 3 to 5 yards and at least 3 repeats (to see what pattern shows up between repeats) and try lots of treadling options. The "snippets" shown below are from 2 Crackle samplers that I wove during Teaching and Learning through Correspondence/HGA with Mimi Smith. References are given of whom I have knowledge.
This is a portion of an 8-shaft sampler I wove. The warp was 3 yards long. You will note the long floats of a few options; it's good to know what doesn't work as well as what will.

This is one of my favorites from the 8-shaft sampler and is Classic Crackle/Susan Wilson. It would have had more pizzazz if I had treadled all 8 blocks.

This was toward the end of the 4-shaft sampler. It is Italian Style/Nancy Lyons.

Classic Crackle/Susan Wilson from the 4-shaft sampler.

Classic Crackle/Susan Wilson from the 4-shaft sampler.

Two-block/Opposites-Type Treadling from the 4-shaft sampler.

Honeycomb Fashion/Barbara Miller from the 4-shaft sampler. I learned this option during 1994 TLC/Overshot with Barbara.

Two different Polychrome blocks/Mary Snyder from the 4-shaft sampler.

Summer and Winter/Mary Snyder from the 4-shaft sampler.

Italian Fashion/Barbara Miller from the 4-shaft sampler.

Changes in the Sizes of Blocks/Mary Snyder from the 4-shaft sampler.

Polychrome/Barbara Miller/Susan Wilson from the 4-shaft sampler.

This is a pillow top I wove several years ago; it was one of my first attempts at using several colors in pattern weaving. You can see that the method I used is a "cheap" way of doing it. I soon found out it is far more effective to blend as in the Flourishing Wave wallhanging below. However, nothing ventured, nothing gained. We often learn more from "mistakes" than when things turn out exactly as planned. And, there was enough hand dyed, value graded yarns left from this project to contribute to the project below.
The warp and tabby is 10/2 perle cotton in solid moss green. The pattern wefts are 5/2 hand dyed value-graded perle cotton in 4 values of plum. From the right side of the picture, I threaded the left side of the blooming leaf twice and then threaded the right side of the leaf twice and treadled as written. I used the same reversal in threading in the star ornament below in order to accent the star. It is fun to move motifs around or thread and treadle a sample with at least repeats in order to see what goes on between the motifs. Then, enlarge or miniaturize or try different treadlings. If miniaturizing, pay close attention to blocks you reduce so as not to compromise the integrity of the design.

Flourishing Wave threading/tromp as writ treadling - Warp and tabby is 10/2 perle cotton in value-graded commercially-dyed blacks and grays. This was the second in a series so, therefore, squared. The pattern wefts are 5/2 hand dyed value-graded perle cotton in 2 hues, 4 values each. The interesting thing about it that does not show up too well in the picture is that I began warping on the far left in black and moved all the way to silver on the right and the same with tabby. The value-graded pattern wefts move from dark at the bottom to light at the top so that the bottom left corner is the darker, more intense corner and the top right is the lighter, less intense corner.

This is a Lee's Surrender runner that is on the gallery page. Warp and tabby are 10/2 perle cotton. Pattern weft is wool. This, too, is tromp as writ but very traditional. I think these first two show the wide range of overshot just in tromp as writ, 4-shaft.

The picture of "Orange Blossom Special" is a little distorted as it was taken from a slide. This is another tromp as writ treadling woven on a Wahoo Blossom threading. The warp and tabby are an olive drab 10/2 perle cotton with 8 or 9 colors of 5/2 perle cotton as pattern weft. As you can tell, the pattern is not squared but it does not necessarily have to be in contemporary overshot weaving.

White House Blue Room Christmas tree ornament, 1999 - This was cut from the center of 4 intersecting leaf motifs for each side, then sewn and stuffed with hand twisted cord. 20/2 perle cotton warp and tabby and 10/2 perle cotton pattern weft.

Wheel of Fortune runner - This was woven for Carrie Ledlow's future bridal table. She was 7 years old when I wove this. 20/2 perle cotton warp and tabby/linen pattern weft.

Crackle Shawl - This was threaded in a Crackle/pointed twill fashion and woven off tromp as writ. The warp and pattern weft are black 8/2 tencel® with alternating tabbies of red purple and ruby 8/2 tencel®. The interesting thing about it that doesn't show up in the picture is that the pattern blocks appear to be navy and the shawl is iridescent; depending on the direction it is seen, it will appear to be red purple, navy, black or ruby. It originally was going to be a Crackle beach towel woven off with hand painted cotton chenille and became a shawl on the loom.

Summer and Winter runner - This is a runner I wove several years ago and in a private collection. The structure is summer and winter with blocks of different sizes both in warp and weft. The warp and tabby are black silk noil. The weft is hand dyed, space-dyed silk bombyx.

Next up - Weaving Treadling Options
Warping a Loom Back to Front - Part 7
Weaving and Finishing
A few tips in weaving prettier fabric:
Weave in small increments such as an inch or a small repeat midway between the breast beam and beater. If you try to get the most out of an advance of the warp by weaving right up next to the breast beam and all the way to the beater, your edges will be uneven due to the differentiation of the weft arc.
Don't handle the selvages. It will change the tension and the selvages will wave lengthwise when you take it off the loom and will not come out with wet-finishing.
Maintain an even beat and develop a rhythm.
When you leave the loom for a period more than a few hours, release the tension on your warp. When you return to weave, adjust the tension. Prior to throwing the first pick, beat once lightly on a closed shed. (The last pick will have traveled just a little so that you will be able to see it off the loom.) Open the next shed and throw a pick.
Step 61: When you reach the end of a bobbin, overlap in the same shed by a few bobbins and continue. If you're weaving with a hand painted, variegated yarn, begin weaving with the same color of the end of the last bobbin. This is particularly true if you're working with a directional colorway like the ones I paint as the color will continue in the same direction.

Step 62: This is a close-up of the step above. You will leave these ends until you have washed your scarf.

Step 63: Final end hem-stitched and the fabric is off the loom. See the weft ends that were overlapped? When the scarf is wet-finished and completely dry, these ends will be trimmed off next to the fabric.

Step 64: This picture shows both sides of the fabric. There is really no wrong side. But the side on the left was the one facing up on the loom when hem-stitched. Hem-stitching looks a little different on the opposite side. So, I recommend twisting on the same side of the fabric. The white spots you see are in the loom waste. I could have decided to trim the fringe shorter but most likely, when the fringe is twisted, it will barely be noticed and won't bother me.

Step 65: Close-up picture of hem-stitching and twisted fringe.

Step 66: Picture of finished stole after wet-finishing and a good hard-press.

A few tips in weaving prettier fabric:
Weave in small increments such as an inch or a small repeat midway between the breast beam and beater. If you try to get the most out of an advance of the warp by weaving right up next to the breast beam and all the way to the beater, your edges will be uneven due to the differentiation of the weft arc.
Don't handle the selvages. It will change the tension and the selvages will wave lengthwise when you take it off the loom and will not come out with wet-finishing.
Maintain an even beat and develop a rhythm.
When you leave the loom for a period more than a few hours, release the tension on your warp. When you return to weave, adjust the tension. Prior to throwing the first pick, beat once lightly on a closed shed. (The last pick will have traveled just a little so that you will be able to see it off the loom.) Open the next shed and throw a pick.
Step 61: When you reach the end of a bobbin, overlap in the same shed by a few bobbins and continue. If you're weaving with a hand painted, variegated yarn, begin weaving with the same color of the end of the last bobbin. This is particularly true if you're working with a directional colorway like the ones I paint as the color will continue in the same direction.

Step 62: This is a close-up of the step above. You will leave these ends until you have washed your scarf.

Step 63: Final end hem-stitched and the fabric is off the loom. See the weft ends that were overlapped? When the scarf is wet-finished and completely dry, these ends will be trimmed off next to the fabric.

Step 64: This picture shows both sides of the fabric. There is really no wrong side. But the side on the left was the one facing up on the loom when hem-stitched. Hem-stitching looks a little different on the opposite side. So, I recommend twisting on the same side of the fabric. The white spots you see are in the loom waste. I could have decided to trim the fringe shorter but most likely, when the fringe is twisted, it will barely be noticed and won't bother me.

Step 65: Close-up picture of hem-stitching and twisted fringe.

Step 66: Picture of finished stole after wet-finishing and a good hard-press.

Warping a Loom Back to Front - Part 6
Tying On
There are many ways to tie on to the front. This happens to be my favorite but I do use other ways depending on the type yarn.
Step 49: Hold a warp bundle tight with one hand. With the other, split the bundle in half from the bottom, making a larks-head loop. Take a section of yarn from the second rod and insert in the loop, pulling so that it is snug. But do not try to tension at this point. Go from one side to the other and the middle tying on until you have all bundles tied. Before applying tension, tie the first rod to the second starting at one edge of the scarf to the other edge. Tighten tension on the loom some so that you don't have to do all the tensioning by hand.

Step 50: Now, pull up on the yarns on the second rod to finish adjusting tension.

Step 51: Tie-up the treadles. For a four-shaft loom with six treadles, you might want to tie up the treadles on the ends for plain weave with left treadle to the first and third shafts from the front and right treadle to the second and fourth shafts from the front. Reserve the four in the center for a twill tie-up. Beginning at the left, tie second treadle to first and second shaft, third treadle to second and third, fourth treadle to third and fourth and fifth treadle to first and fourth. Personally, I enjoy a direct tie-up or one shaft tied to one treadle and weave with two feet. It is easier on feet, knees and hip joints and as long as you are weaving on four shafts, retying the loom is unnecessary.

Step 52: Time to spread or close up the warp. This is the quickest manner to do it. With a slick, smooth yarn in your shuttle, tie a knot onto the rod holding the warp.

Step 53: Throw about three picks, wrapping the weft around the ends of the rod with each pick. Do not beat until after the third pick.

Step 54: Then, beat on a closed shed.

Step 55: The warp is not quite closed. Throw three more picks in the same manner as above.

Step 56: Beat on a closed shed.

Step 57: Throw three more picks.

Step 58: Beat on a closed shed. Now, it appears to be completely spread or closed and ready to begin weaving.
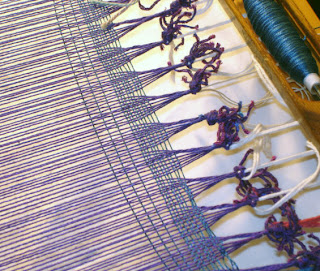
Step 59: Leave space for fringe. Some weave this space but I have found that it is unnecessary. If you care to hem-stitch, start weaving on the right if you're right-handed and on the left if you're left-handed. Leave a tail of three or four times the width of the warp to hem-stitch and weave a couple of inches. Since I don't have an apron on my loom, I place white fabric underneath the warp so that I can see better to hem-stitch.

Step 60: Hem-stitching completed. Continue to weave.

Next - overlapping beginning and ending of weft.
There are many ways to tie on to the front. This happens to be my favorite but I do use other ways depending on the type yarn.
Step 49: Hold a warp bundle tight with one hand. With the other, split the bundle in half from the bottom, making a larks-head loop. Take a section of yarn from the second rod and insert in the loop, pulling so that it is snug. But do not try to tension at this point. Go from one side to the other and the middle tying on until you have all bundles tied. Before applying tension, tie the first rod to the second starting at one edge of the scarf to the other edge. Tighten tension on the loom some so that you don't have to do all the tensioning by hand.

Step 50: Now, pull up on the yarns on the second rod to finish adjusting tension.

Step 51: Tie-up the treadles. For a four-shaft loom with six treadles, you might want to tie up the treadles on the ends for plain weave with left treadle to the first and third shafts from the front and right treadle to the second and fourth shafts from the front. Reserve the four in the center for a twill tie-up. Beginning at the left, tie second treadle to first and second shaft, third treadle to second and third, fourth treadle to third and fourth and fifth treadle to first and fourth. Personally, I enjoy a direct tie-up or one shaft tied to one treadle and weave with two feet. It is easier on feet, knees and hip joints and as long as you are weaving on four shafts, retying the loom is unnecessary.

Step 52: Time to spread or close up the warp. This is the quickest manner to do it. With a slick, smooth yarn in your shuttle, tie a knot onto the rod holding the warp.

Step 53: Throw about three picks, wrapping the weft around the ends of the rod with each pick. Do not beat until after the third pick.

Step 54: Then, beat on a closed shed.

Step 55: The warp is not quite closed. Throw three more picks in the same manner as above.

Step 56: Beat on a closed shed.

Step 57: Throw three more picks.

Step 58: Beat on a closed shed. Now, it appears to be completely spread or closed and ready to begin weaving.

Step 59: Leave space for fringe. Some weave this space but I have found that it is unnecessary. If you care to hem-stitch, start weaving on the right if you're right-handed and on the left if you're left-handed. Leave a tail of three or four times the width of the warp to hem-stitch and weave a couple of inches. Since I don't have an apron on my loom, I place white fabric underneath the warp so that I can see better to hem-stitch.

Step 60: Hem-stitching completed. Continue to weave.

Next - overlapping beginning and ending of weft.
Subscribe to:
Posts (Atom)

 Posts
Posts


