Saturday, September 3, 2011

Warping a Loom Back to Front - Part 4

Threading the Heddles - Part 2

Continue to thread the heddles and begin to sley the reed.

Step 25: Here is the first repeat threaded.


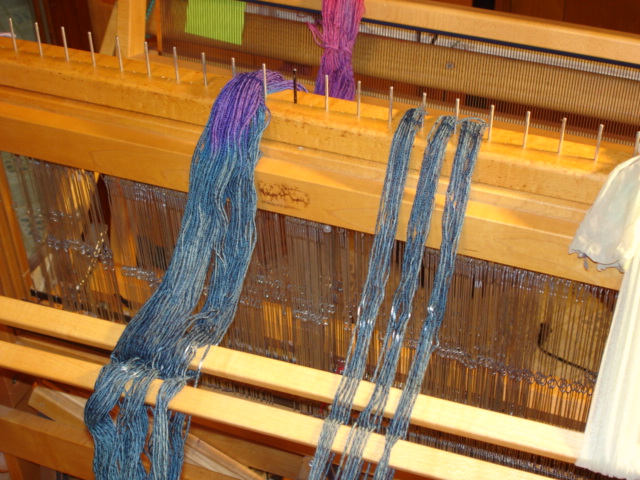
Step 26: Continue threading. Here, I have left one end on the outside in case I decide on floating selvages. Generally, I will tie groups of one inch sett in a bundle with half hitches shown here.


Step 27: The heddle bars are still unclipped. Shake ends from the front so that ends fall in natural position.


Step 28: The heddle bars are still unclipped. This is a wide angle of the previous picture.


Step 29: Yarns are lined up and ready to clip heddle bars. Separate just a little in order to get to the clips easier. (Correction: see step #41.)


Step 30: Raise shafts one at a time to reach clips easier. Note heddle bars that need cleaning! Clip top and bottom of each shaft. Some looms have one on each side, top and bottom.


Step 31: Heddle bars are clipped. If this warp were wider, this step would have been a little early. Really, the reed should be sleyed first. (Yes, it was a little early. See 41.)


Step 32: Loom is unfolded. Lease sticks are still in place.


Step 33: Remove the lease sticks.


Step 34: Ready to sley the reed.


Step 35: This is the same as previous but shown from the front of the loom.


Step 36: Determine the reed size needed and place in the beater bar. Tie the beater so that it is perpendicular to the warp. Some looms are equipped with a pin on the side of the loom frame with a hole there that matches up with one in the beater.


The reed is almost ready to be sleyed.


Friday, September 2, 2011

Warping a Loom Back to Front - Part 3

Threading the Heddles - Part 1

Threading the heddles is the next step in preparing your warp to weave.

Step 13: Remove the raddle at this point.


Step 14: Find the end loop in front of the loom. See my left thumb underneath the choke? My right hand is through the loop.


Step 15: See how the cross followed through?


Step 16: Keep the loop in one hand and pull small sections at a time, holding the tension and cut the loop. Continue across the warp.


Step 17: When you've finished cutting, drop the ends over behind the shafts.


Step 18: Fold up the loom, if possible, if your breast beam is not removable. I should have removed the Wolf Trap but did that later. The point is to make the loom as comfortable as you can for your body. Make it work for your body, not the opposite, body working for the loom. Some shafts are hard to reach. You can raise them underneath with dowels.


Step 19: In this picture, the reed is now removed. I should have done that earlier too but no problem to remove it with the Baby Wolf.


Step 20: Note that the heddle bars are clipped to the shafts here. Also note the dye of a warp I painted *on* my loom several years ago. It hurt at the time but it is an old friend now and a piece of equipment.


Step 21: Now, you can sit in a shorter chair and see the heddles easily.


Step 22: Find the center of the heddles. My heddles are marked in the center with red thread. Some weavers use nail polish. Depending on the pattern you are using, figure the number of heddles required per shaft and pull half from the right side. You would want to work these spare heddles in with ones you are threading if you were weaving the full width of the loom as they would rub the selvages. Some weavers like to add a few extra between ones that are threaded in the event a repair heddle is needed. I find it confusing and easier to tie a repair heddle if needed.


Step 23: Push all of the heddles just pulled to the left after unclipping the heddle bars from shafts.


Step 24: One pattern repeat is pulled forward here. In this case, it is plain weave. See the heddles on shafts one through four?


I will continue to thread the heddles on the next page.

Warping a Loom Back to Front - Part 2

Beaming the Warp

In order to weave, the loom must be warped. You have to be warped to weave. Beaming the warp is the term used to wind the warp onto the loom in order to weave.

Step 1: unchain the warp and place the end toward the cross through the rod attached to the back beam. My Baby Wolf has two. The steel rod is 3/8" and was purchased locally. If using two rods, secure the two rods temporarily on the ends with large, strong rubber bands such as the ones found on vegetables. Place lease sticks in place. I secure mine with loose-leaf ring binders and tie on both sides of both lease sticks to the loom so that they will stay in place while warping. There are various ways to do this as well as various equipment. I find that this works for me and "free" as it's cut off legs from panty hose.


Step 2: this is the same as #1 but shown from the back of the loom.


Step 3: remove the chokes from the loop on the back and at the four places on the cross.


Step 4: tie on raddle and spread the warp by ends per inch in one inch sections. Note the black peg that is the center marker on this raddle. Mathematically divide the warp in half and start placing ends in the raddle either from left or right in the correct place so that the warp will be centered on the back beam. Please be sure your warp is going over the back beam!


Step 5: this picture shows the warp completely spread in the raddle.


Step 6: place on the raddle top. If you are using a homemade raddle, rubber bands will work fine.


Step 7: the picture here shows that the two back rods are not tied together yet except for the ends that are held with rubber bands.


Step 8: tie the two rods together starting at width of the scarf and tie three or four times to the other end of the warp leaving the remaining of the rod free. I do leave the rubber bands in place but it's not necessary. Call it my security blanket.


Step 9: shake, raddle and roll. Shake out the warp from the front and create tension on the warp. This loom is easier than most to hold tension with my hand and advance the warp, otherwise known as rolling it on. Note that it is going through the raddle to maintain the width on the back beam. This picture shows one advancement of the warp.


Step 10: place separators such as a continuous roll of paper, bamboo blinds or corrugated cardboard. Some use uncoated wall paper.


Step 11: continue to advance, shaking, tensioning and cutting tie-bands off the warp as you go.


Step 12: the warp in this picture is now beamed and the top of the raddle is removed. If you're using rubber bands, remove them.


Warping a Loom Back to Front - Part 1

Warping a loom from back to front is the favored method of many handloom weavers. It preserves the tension so carefully maintained in the measuring process. In addition, the warp only travels through the heddles and reed once so that there is less abrasion of the warp.

This is the beginnings of warping a pre-wound painted warp from back to front. There are a lot of different ways to warp a loom and I don't profess to know them all. Nor, do I know about every loom. This is a 4-shaft Schacht Baby Wolf which is a jack-style loom and the steps shown here are what work best for me with this loom. Occasionally, I will use different methods of tying on depending on the type yarn I'm using. The yarn in this warp is a cotton/rayon that I dyed when I owned Heritage Yarns.

Assuming your warp is wound as is this pre-wound, painted warp, beaming the warp is the next step in the process. Occasionally, I will add to these pages and hope that if you have any questions about the process I use, you will contact me at handdyer@comcast.net.

When weaving doesn't seem to be going your way, read the notes from Bill Koepp below and know that we all occasionally experience fabric that doesn't live up to our expectations. Generally, I have learned a lot more from these times than when everything goes as planned.

Happy weaving,
Margaret

A Weaver's Whimsey

1. Whatever the tie-up is, there's probably a better one.
2. If anything can mess up the warp, it probably will.
3. Whatever the draft is, there'll be someone who will misinterpret it.
4. Even if it's very hard to come up with the wrong threading, a way will be found.
5. If the fell smiles, the weaver doesn't.
6. There are never too many bobbins, quills or shuttles.
7. Only your best or newest shuttle will hit the floor.
8. Errors will stay hidden until nine picks are thrown.
9. Most errors will pop up in the center of the fabric.
10. In your weaving notes the parts that are absolutely beyond any need of checking, have the mistakes.
11. Whatever color is chosen, it'll be out of fashion as soon as the project is finished.

Bill Koepp, CA

Friday, July 1, 2011

Finished Project

This is mostly finished but I am considering adding some white to the dog and/or a leaf close to the dog in order to balance color. It was a lot of fun to hook.


Monday, May 2, 2011

King of the Barnyard progress

This is my latest rug hooking project. The light was not that good so, the color is not representative. The light green is from a fiber swap at The Welcome Mat. I am using it to outline the animals. The remainder of the background will be in several light greens pictured below.


Saturday, April 23, 2011

Confederate Jasmine

This is the Confederate Jasmine (and California ivy) on our front porch. It's the first time it's bloomed and in the shade; it generally likes sun. it is climbing around the grapevine wreath with no help from me. I look forward to see it fully cover it.


Confederate Jasmine